Thursday, September 29, 2011

Grilled Pizzas


This emo post is brought to you by my obsession with Instagram.  I'm trying to bring a more edgy post to the blog.  Next thing you know I'm going to be sporting asymmetrical bangs.

But really, the lighting in Daum's kitchen was "interesting" and I'm doing what I can. 

I've been wanted to make grilled pizzas all summer, so naturally we wait until a chilly fall night with the promise of rain to do so.  There isn't really much of recipe to share with in this post.  We cobble together a respectable, if not extremely garlicky, almond pesto for one of our pizzas.  I'm keeping a safe distance from most of my co-workers today.  After our third trip to our second grocery store and one Walgreens we realized we forgot pizza sauce and decided to make one out of tomato paste and water with few dried Italian seasoning and fresh basil.  I was skeptical, but it works and now I will never hear the end of it.

Daum made the dough, I'm going to try and replicate the instructions; however, truth be told I was eating popcorn and drinking a gin and tonic.  I'm deviating from my usual format. 

Cause I'm emo.  And I Just. Don't. Care.

For one crust: (Adapted from a basic pizza crust recipe)

Combine 1 1/2 cups of warm water with one packet of dry active yeast and 2 teaspoons of white sugar.  Let sit for at least 10 minutes.  The mixture should be foamy.  In a separate bowl combine 2 cups of flour, 1 teaspoon of salt, 1 teaspoon of garlic powder (optional) and 1 tablespoon of olive oil.

Yeast doing it's thing, flour mixture patiently waiting.
When the yeast is active, combine with the flour mixture.  
Married!
Mix to combine fully, then turn out the dough onto a floured surface and kneed until smooth and elastic.
NOT my hands!!

Smooth elastic dough
Cover and place in a warm, dry spot for at least an hour or until dough doubles in size.  We put ours in Daum's oven.  Why?  Because he told me to and I didn't feel like questioning him.  I was very excited by how much the dough grew.  I'm not much of (or at all) a baker, aside from cookies here and there and the expansion of the dough just fascinated me.  Maybe a little too much.  I didn't get any pictures of my fingerprint indents.
Ready to roll!    Out that is.
Daum was the first to roll the dough out.  Unfortunately I did not get a picture of mine for comparison.  I'm assured the "abstract" shape was intentional.
It was literally 3 feet long
We prepped all the toppings a head of time, because once we got the dough on the grill it was a bit of a race to get all the topping on in time so the cheese would melt and the crust would not burn.
Of course
the fresh Roma tomatoes really made the pesto pizza
So basically:  Dough, pizza sauce, pesto, cheese and toppings. We brushed olive oil on one side of the dough, and placed it oil side down on a hot, preheated grill (medium-high) and let it cook for about 3-5 minutes until it bubbled slightly.  We brushed the other side with oil before be flipped it over.  The toppings went on the previously charred side.
i kind of wish we had left it longer
Two pizzas with crispy dough, (the way I prefer it) slightly charred from the grill and, if I must say so myself, (and I will) perfect topping combinations:
Daum's
A tomato sauce based one that contained sliced pepperoni, sauteed mushroom and a cheese blend of mozzarella and cheddar.  Oh and a few jalapenos, but we don't talk about them, darn their beautiful green color!
MINE!

A combination of almond pesto as a sauce, with fresh Roma tomatoes, prosciutto and fresh mozzarella.

What our pizzas lacked in presentation, the certainly made up for in taste! I cannot wait to make this dough again and try out mini flat breads in my grill pan. 

Wednesday, September 28, 2011

M&C Wednesday: Cheddar Beer Mac and Cheese with Brats and Pretzel Topping


I think I'm still full.  I am not kidding, this concoction that I made last night is still making me groan (albeit quietly, I am at work people) in a completely satisfied way.

As September speeds towards it's end, I decided I could wait no longer to pay tribute to my favorite fall month of October and wanted to create an Oktoberfest-ish mac and cheese.

My vision was to combine a hearty cheddar beer sauce with salty, crispy sliced bratwurst and top it all with a crunchy pretzel topping.  I used this as a base recipe and I think I was able to achieve this, although the sauce was not as beery as I envisioned.  I think everything worked well together; especially the pretzel topping. 

The four mac and cheese components were as follows:

         Pasta shape:  Cellentani (probably my most favorite pasta shape for mac and cheese)
         Cheese:  A combination of Wisconsin sharp cheddar and extra sharp cheddar
         Mix-in:  Bratwurst
         Topping:  Pretzel crumbs

I had planned to just use store bought soft pretzels and create chunky bread crumbs out of them; however, when I expressing my wish that I had time to make my own pretzels to Daum, but lamenting that if I did so we wouldn't be eating mac and cheese until midnight, he graciously offered to make the dough.  He did and then shoved it in his backpack to bring to my place.  He may just like me a little bit!  I'm hoping to pull together a homemade pretzel post in the near future, but first:

Cheddar-Beer Mac and Cheese with Bratwurst and Pretzel Topping

Recipe-Makes so much it's gross (or serves 8)

Ingredients

1 lb Cellentani pasta, or whatever pasta strikes your fancy
4 links bratwurst
8 tablespoons butter, divided
6 tablespoons all purpose flour
8 ounces beer,  I used Samuel Adams Octoberfest
3 cups 2% Milk
1 tablespoon dry mustard
16 ounces cheddar cheese, shredded
2 soft pretzels
1 to 2 teaspoons garlic powder
1 to 2 teaspoons dried parsley

Directions

Preheat oven to 350.

Boil pasta in a large pot of salted water until al dente.  Pour into a buttered two quart casserole dish or 9x13 inch baking pan.

While pasta is cooking, slice the bratwurst in half vertically and slice into a half-moon shapes.  Heat a sauce pan over medium high heat and cook the bratwurst until browned on both sides.  Remove from the pan.

To the same pan add 6 tablespoon of butter until melted and then add in the flour.  Whisk together butter and flour until it forms a loose paste or roux.  Season with salt, pepper and dry mustard.  Allow the roux to cook to alleviate the raw flour taste, about 2 minutes. 

Add in the beer stirring with a whisk until completely combine and the mixture thickens, about 3-4 minutes.  Slowly add in the milk about 1/2 to 1 cup at a time.  Let the beer, milk and roux mixture thicken before adding more.
When all the milk has been added and the sauce coats the spoon, add the cheese a few hand fulls at a time until it is all melted.

Scatter the bratwurst among the pasta and pour the cheese sauce over the top.  Stir in the pan to make sure the sauce is evenly distributed. 

Tear the soft pretzels into small chucks, about an inch big and place them in the bowl of a food processor or mini chopper.  I have this amazing mini-chopper that came with my immersion blender that is perfect for making bread crumbs!  Pulse the pretzels until they form chunky bread crumbs.  Remove to a bowl.  In a microwave safe bowl (I used a coffee mug) melt 2 tablespoons of butter.  When melted add in the garlic powder and dried parsley.  This can be done to taste.  I like the parsley for the tiny bit of color it adds.  Combine the butter mixture with the pretzel crumbs and sprinkle over the mac and cheese.

Bake for 30 minutes or until bubbly and don't forget to broil for awesome crunchy topping!  That always manages to be my favorite part.  More than once have my hands been slapped away from the crunchy topping!


There was definitely a hearty taste to this dish that wasn't as apparent in my basic recipe.  The beer added a slight depth to the flavor, an almost bitterness that complimented the sharpness of the cheddar and the sweetness of the pretzel topping.  I feel that it still may need some tweaks here and there.  Maybe a little more beer and a little less milk, but all and all my fellow guinea pigs and I were very satisfied.  So satisfied I my be forgoing dinner this evening.

But who am I kidding!

More pics to follow.....technical difficulties... and by that I mean I'm kind of an idiot with my camera.

Monday, September 26, 2011

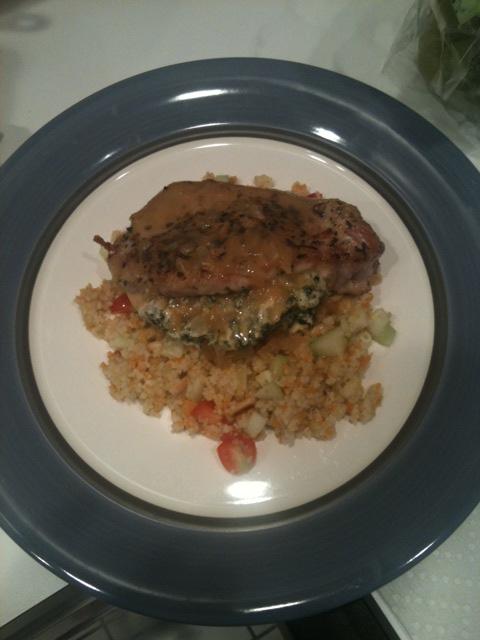
Spinach and Feta Stuffed Pork Chops with Mediterranean Couscous


I'm a meat-eater, a prolific carnivore.  I like my red meat medium-rare.  Daum's the same way.  If there is steak tar tare on a menu, you better believe we're ordering it and if there is carpaccio on the menu as well, it's like "Sophie's choice" for us.  Medium rare lamb loin chop?  Yes, please!  It's nice to have someone you don't have to argue with about the way you cook your meat.  Sigh, it's the little things.

That being said, I usually reserve red meat for rare (no pun intended) occasions and on a day-to-day basis stick to chicken, fish or shellfish, more "lighter" proteins.  I've also been seen not including any animal-bases protein: (Gasp!) sticking to vegetarian options.

I love pork, but I haven't used it too much in my cooking, except for the extremely trashy "Stovetop" stuffed pork chops.  When I saw a beautiful pair of boneless pork loin chops at my local grocer, an inch thick, perfectly pink with a thin trimming of flavorful fat, at the insanely low price of $2.66, I knew it was time to experiment.

What I came up with was a perfect Sunday night dinner for two:

Spinach and Feta Stuffed Pork Chops with Mediterranean Couscous

Recipe-Serves 2

Ingredients

Pork Chops

2 tablespoons olive oil, divided
1/2 cup onion, diced
1 cup thawed frozen spinach or about 7 ounces fresh
1/2 cup feta cheese
1/4 cup cream cheese or neufchatel (a little less fatty than cream cheese)
2 boneless pork loin chops, about 4 ounces each
salt and pepper to taste
2 teaspoons Greek seasoning

Lemon Pan Sauce

1 teaspoon olive oil
1/4 cup onion, minced
1 cup chicken stock or broth
1 tablespoon fresh lemon juice
1 tablespoon cornstarch
1 tablespoon water

Couscous

1 Cup Water or Chicken Stock
1/2 Couscous
1 teaspoon fresh lemon juice
salt and pepper to taste
3/4 cup grape tomatoes, quartered
3/4 cup chopped cucumber
1/2 cup feta cheese
1/4 cup pine nuts, toasted

Directions

For the chops:  Preheat oven to 400 degrees.

Heat 1 tablespoon of oil in a 12 inch stainless steel skillet over medium high heat.

Add onion and saute until soft and slightly browned.  Add in spinach and stir combine (if using fresh spinach let it wilt down) and season with salt and pepper to taste.  Add in both the feta and cream cheese and stir to melt and combine.  Remove from heat and slightly cool.

While the stuffing mixture is cooling take each pork chop and on the thickest side of the chop take a pairing knife and make a pocket about 2 inches wide and three inches deep, depending on the size of the chop.  Be careful not to cut all the way through.


When the stuffing has cooled enough to handle, stuff about 1/4 of the mixture into each pocket.  There may be stuffing left over.  The openings can be secured with toothpicks, but I was out of those that night, so I left mine open.
Working so fast I'm a blur.  (my appologies)
Wipe out the pan that held the stuffing and add the remaining tablespoon of olive oil over medium high heat until rippling or when it sizzles if you drip water on it.  Sprinkle the chops on both sides with salt, pepper and Greek seasoning. 

Add chops to the pan and brown on both sides, about 3 minutes per side.  When browned, place the pan in the oven for 10 mins or until desired degree of doneness.  Pork may be eaten a little bit pink.


Be careful after taking the pan out of the oven, I always forget that it's hot and touch it every time!  Smart....

For the lemon pan sauce:  Heat olive oil in a separate pan.  Add onion and saute until softened.  Pour in chicken broth and deglaze the pan, scraping up any brown bits.  Bring to a boil and let reduce slightly, about 3-5 minutes.  Stir in lemon juice a teaspoon at a time until desired flavor.  A little fresh lemon juice goes a long way.  I love fresh lemon, but for some it can be too tart.  If it becomes too tart, add in more broth. 

In a small dish combine cornstarch and water until smooth.  Add in cornstarch mixture a little at a time until the sauce reaches your desired consistency.  Season to taste with salt and pepper.

For the couscous:  Bring the water or stock, lemon juice salt and pepper to a boil.  Add in couscous and stir.  Take off the heat and let stand for 5 minutes before fluffing with a fork.  (of follow your package directions.)  Add in tomatoes, cucumber, feta and pine nuts. 

Serve the pork on top of the couscous and top with the lemon pan sauce so the grains can soak up all the yummy sauce as well as the pork's juices.


I was extremely happy with the way this pork came out.  One of my biggest fear with pork is that it will be dry, but the stuffing helped keep it moist and flavorful.  The stuffing itself was a nice combination of tangy and creamy with the spinach adding a nice texture and color.  The couscous provided a nice bed for the pork and the freshness of the tomatoes and cucumber were complemented by the lemon sauce and brought a brightness to the dish while the pine nuts added a nice crunch.

A perfect, easy way to avoid the Sunday night take-out slump and end the weekend on a tasty note!

Thursday, September 22, 2011

Things I'm Loving, September

I have a love for new food finds.  If something has "new!" or "limited edition" on it, you can be sure it's going to find it's way into my shopping cart.  I also like to tell everyone about the new fun food that I find. 

1.  Gerbs

Image: Gerbs Pumpkin Seeds Co.
Gerbs are basically pepitas.  Pepitas are the inside "meat" of the pumpkin seed.  I came across these beauties a few night ago while aimlessly wandering around my Whole Foods trying to decide on what to eat for dinner.  I'm a sucker for anything salty and if you add in crunchy?  I'm sold!  I've only tired the "Touch of Sea Salt" variety, but all the others sound very tempting too!  A+ for me too, as they are produced in Rhode Island and are dry roasted and kept as simple as possible!  Very vanilla!

They would be a great addition to any salad, sprinkled on top of a warm creamy pumpkin soup or my preferred method, by the fistful.

2.  Haagen-Dazs(c) - Caramel Apple Pie Ice Cream


Image
I may have just drooled a little when I uploaded this image.  I'm not a huge "sweets person", but I usually have to at least try every "new" and "limited edition" flavor from Haagen-Dazs or Ben and Jerry's.  I also gravitate towards more vanilla (shocking!) based flavors, rather than chocolate.  This I had to have.  I actually squealed a little when I found it in the freezer at the store.

It takes a cinnamon apple ice cream base and swirled in thick buttery caramel and punctuates this combination with chunks of crisp apple and flaky pie crust.  The taste is unbelievably fall without the hassle of peeling, coring and slicing a few pounds of apples.

3.  Pumpkin Pie Pop-Tarts

Image
Full disclosure:  I haven't had these yet, but I LOVE the idea.  I have seen them though at Target, but I couldn't bring myself to buy the double box.  If it was a single box you can bet they would have been hitting the bottom of my basket, but 12 just seemed unmanageable. My friend and extreme pumpkin aficionado has purchased these and if she can restrain herself to save me one, I will hopefully be able to try them.
4.  Kettle Brand - Zesty Ranch Flavor


Image
 My name is Kate, I'm Vanilla and I'm a chip-aholic.  Kettle Brand chips are my favorite brand.  For a chip-aholic to narrow it down to one brand?  That's something!  When this flavor appeared on the small wire shelved that house a meager selection of chips at the basement coffee cart, I was overjoyed and a little scared.  How would I ever be able to resist the chip temptation at lunch if there are ranch flavored chips?  Zesty Ranch at that!  I have been doing an adequate job so far, but I can find myself dreaming of the deep crunch potato-ey ridges sprinkled with a seasoning that proves to be cool and zesty in the same bite.  I love Kettle Brand for their sturdy build and extra crispy bite to each and every chip.  They stand up perfectly to (what else?) Ranch dip!

It was hard to narrow down my choices today, but it had to be done!  Someone, who shall remain nameless (DAUM) said I can be a little wordy.  I will be on the look out for anything new to share with everyone!

Trust me!  These are all winners.  Well I will vouch for all but the Pop-Tart, but I can't imagine I would spit it out in disgust. 

Enjoy and happy new product hunting!

Wednesday, September 21, 2011

M&C Wednesday: Good Ol' Mac and Cheese

Mac and cheese has been receiving quite the face lift in the past few years.  Now a staple on many restaurants menus, the dish is seen in many forms.  I've seen it dressed up (lobster, truffles) as well as, dressed down (Velveeta, Ritz topping).  What most of us have associated with neon orange powder and limp soggy tubes of pasta has grown up and donned a whole new wardrobe.

While I was also subjected to the space-aged powdered variety, I was also lucky enough to be born to a mother who appreciates food and fostered in her only daughter a drive to create and seek better food.  Her homemade mac and cheese is the building blocks from which I create my own version of the ultimate comfort food.

We always get a good laugh that she originally took the recipe from the back of a pasta box.

In my opinion, there are four components to a good mac and cheese:
           
            1. Pasta shape
            2. Cheese
            3. Accents or Mix-ins
            4. Topping

With those four components there are infinite possibilities. I have experimented with a lot of combinations, but since this was the first time Daum was going to have my mac and cheese (and he was skeptical) I decided to keep in simple.  I chose three cheeses, one simple mix-in (which I knew would hook him) and for the first time, a homemade breadcrumb topping.  I don't know how I came so late into the homemade crouton/breadcrumb game, but I'm never going back.  NEVER!

The most important characteristic of the pasta shape is that it must must allow the cheese to get trapped within its shape.

I chose orechiette for this one because I was trying to be fancy and I have never used it before.  Orechiette means "little ears" in Italian.  So just think how much water gets trapped in your ear when you go swimming...that's cheese sauce.  Mmmmm...

I agonized over the types of cheese I was going to include.  I already knew I was going to use a white sharp cheddar as my base cheese.  There's no getting around that; I don't think I could make a mac and cheese with out it.  It would just be sacrilegious! 

The other types were hard.  I went into Trader Joe's with all Italian cheeses in mind.  Maybe a combination of asiago, fontina and parmesan, but it was not to be, as there was no fontina to be found. I ended up leaving with asiago and manchego.  It was a surprise to me too!  I wanted the asiago for its salty sharp taste and it melts wonderfully, and I chose the Manchego, well basically because I love manchego and it is hard for me to resist Trader Joe's prices, but also because when it melts I've noticed it had a slight stringy texture that make you go "ooohhh" when you pull your fork off of your plate. 

My mix in was pancetta:  fancy Italian bacon.  I've gotten Daum hooked on that.

Mac and Cheese with Pancetta and Homemade Breadcrumb Topping

Ingredients

1 lb orechiette
4 ounces pancetta, diced
6 tablespoons butter
6 tablespoons flour
salt and pepper to taste
4 cups Milk ( used 1%) for a richer cheese sauce up the percentage of milk fat.
5 cups of assorted cheese, shredded (I used sharp white cheddar, asiago and manchego)
1-2 cups homemade breadcrumbs

Directions

Preheat the oven to 350.

Boil pasta in a large pot of salted water until al dente.  Pour into a buttered two quart casserole dish or 9x13 inch baking pan.

While pasta is cooking, add the diced pancetta to a 5 quart sauce pan.  Stir until brown and remove to a paper towel lined plate to drain.

Discard most of the fat that rendered from the pancetta and add 6 tablespoons of the butter to the pan.  Allow the butter to melt before adding 6 tablespoons of flour.

Whisk together butter and flour until it forms a loose paste or roux.  Season with salt and pepper.  Remember the cheese is salty as well so only a little salt is needed if any.  Allow the roux to cook to alleviate the raw flour taste, about 2 minutes.  Be careful  not to let it burn.

Slowly add in the milk.  About 1/2 cup to 1 cup at a time.  Let the milk and roux mixture thicken before adding more.

When all the milk has been added and the mixture coats the spoon, add the cheese a few hand fulls at a time until it is all melted.  When completely combined stir in the pancetta.

Pour the cheese sauce on top of the pasta and stir to combine.  Top with homemade bread crumbs and bake for 30 minutes, until cheese is bubbling and crumbs are crisp and dark brown.

Optional:  Broil for the last five minutes on high to crisp the breadcrumbs more.
Right out of the oven.  I have the burnt tongue to prove it!
What you should end up with is a filling, comforting mess of sharp tangy creamy cheese with chewy pasta and a crispy buttery topping. 
Trust me the pancetta is in there!

I served this with a quick Caesar salad with homemade dressing and homemade croutons. 


Serve generous portions to your friends and you will never lose them!  Also helpful in retaining boyfriends and soothing irate neighbors, double that if you served them Vodka and Grapefruit Soda Cocktails.
Half-full and on it's way to empty.


Friday, September 9, 2011

Chicken Sausage and Mushroom Hash

If there's one thing I have to try on any breakfast menu, it's the corned beef hash.  It varies from place to place and the good places serve it homemade with little stringy pieces of salty corned beef meshed with crispy fried potatoes and sweet onions.  My favorite place to go for hash is The Neighborhood in Somerville.  I used to frequent this place when living in Porter Square.  Now that I'm car less in Beacon Hill it's a little more difficult.  I've been singing the restaurants praises to Daum so we'll see if he catches on. 

Some places use the canned stuff that most people probably associate with corned beef hash:  mushy and salty with tiny, square potato pieces:

A la Hormel:


Image Corned Beef
I'm not going to lie, I will eat this just as quickly as I will the homemade kind.  I'll only be 85% happy instead of 100%. 

Everyone has their hangover food and this is it for me.  This or fountain Coke.  (Yah I admitted it!)

The morning of Labor Day I was faced with a mountain of leftovers and being slightly hungover the idea of a hash crept into my mind.  The result was a steak tip potato hash topped with deliciously runny eggs.  It was crispy and greasy and comforting all at the same time.  A real stick to the ribs (and unfortunately hips) meal.  So much so that I did not eat again until much later that evening.

Last night I was cooking for one on a dreary, cold, wet night here in Boston and again I wanted to see if I could create a more healthy dish that would be like a hash.

First I was wondering if I was abusing the word "hash".  Did it mean something specific?  Was I misusing the word, prostituting it for my own purposes.  A quick search (nerd) told me I was fine.

A "hash" for all intents and purposes, by dictionary definition, is as follows:

                          "A dish of chopped meat, potatoes, and sometimes vegetables, usually browned.
                                       a. A jumble; a hodgepodge
                                       b. Informal A mess"

So I set out to create a more healthy version of hash and to avoid definition b.  What came out of my attempt was a filling yet healthy:

Chicken Sausage and Mushroom Hash with Fried Egg.

Recipe- serves 1 (can obviously be tailored for a larger group)

 Ingredients

1 teaspoon Olive Oil or cooking spray
1 link chicken sausage diced (I think any flavor would do.  I only had spinach and feta on hand and it worked perfectly)
1/2 cup red onion, diced 
1/2 cup red and yellow bell pepper, diced
1 cup white mushrooms, sliced
2 teaspoon rosemary
salt and pepper to taste
1 medium sized red potato par cooked and cut into 1/2 inch pieces
1 Egg

Directions

Scrub the potato and pierce all over with a fork.  Microwave for 3 minutes or until partially cooked.  Dice when it is cool enough to handle.  Or if you're impatient like me: burn your fingers.

Heat olive oil or cooking spray in a non-stick pan over medium high heat.

Brown chicken sausage.

Add red onion and saute until softened. 

When softened add red and yellow bell pepper, mushrooms, rosemary, salt and pepper and saute over medium heat until all are soften and have released their moisture, about 10 minutes.

Add potato and stir to combine.  Cook until the potatoes have cooked completely.  They should be very soft.


While hash is cooking, heat cooking spray in a separate skillet over medium high heat.  Crack one egg and fry until desired doneness.  I prefer a very runny egg!  For a more heartier version fry two eggs.

Serve hash with the fried egg on top

My best suggestion is to break the yolk right away to allow the the silky goodness to seep into the crispy hash.  I"m just upset the I missed the runny egg money shot.

One note:  when cooking for just myself, I've found one of the best ways to save time and money is to utilize my grocery store's salad bar.  I was able to get the onions, peppers and mushrooms there for only $3.80 and I only have to take as much as I need.

Hangover food in the time it would take you to get your hungover butt to any local greasy spoon, and you don't have to change out of your sweats!


Thursday, September 1, 2011

Good Intentions...Am I Paving the Road to Hell?

I have thought about starting a food blog for a while.  At my soul-crushing, monotonous job, I spend a lot of my time trolling though the plethora of food blogs out there.  Well not just food blogs, but those are the ones that capture my attention. 

It's amazing how much time can be killed with blog surfing. 

Then it hit me.  How much more time could be killed with blog creating.  Talk about lightning bolt.  I created my first post on a whim and then life took over and I haven't cooked at all.  Alright that's a lie.  I actually created a three course dinner that included smoked salmon and cream cheese stuffed into celery stick for appetizers, gazpacho with homemade garlic croutons and cotija cheese and a grilled steak salad with homemade Green Goddess dressing. 

I forgot to take pictures.

I was devastated!  Everything was so pretty. 

I blamed Daum.  Lucky for me, he's a good sport.

So I didn't want to just leave this hanging.  I'm hoping to come into more time as the fall approaches, the cool air swirls in and my need to create and cook returns.

I'll just leave you with one of my favorite things to eat.  Oysters!  I'm so lucky to live New England where the oysters are aplenty and you can always find them on special if you know where to look. 
This weekend took us to Cape Cod for a family wedding; Falmouth, to be exact.  We found ourselves with a little time to kill and lucky for us The Falmouth Raw Bar was right across the street.


It made for a fabulous two hours and two happy campers.  Only one happy camper did not photo well.  Guess who?

Yah not him.....

Bingo!  (We're still not sure what was going on in this picture)  Probably me insisting he tell me when he's going to actually take the picture.  Sadly enough...only one drink in.  Sigh....

My goal is to actually think about pictures.  The view was amazing; our drinks were beautiful and the photos above are all I have to show for it.

VIGILANCE!  That's my new goal.